Vegan Creamy Noodles with Yellow Squash and Mushrooms – Vegan, Gluten-Free, and Nut-Free

The Story

One day when I was visiting in my early 20s, my parents swore there was nothing in the house to use to make dinner. I promised them that I could always find something to eat. I gathered what I could find and made a delicious meal that turned into a family classic for the next decade. There’s just one problem. It is absolutely not vegan. I wanted to find a way to cook something similar, but without meat and cheese. This “Vegan Creamy Yellow Squash and Mushroom Pasta” was born.

My family absolutely loved this new recipe. They were asking for the recipe to take home, but I hadn’t even typed it up. It all just came together as a need to use some things in my fridge and convert the other recipe to vegan. It doesn’t taste at all healthy, but it really is much healthier than the previous version. Plus, there was not a speck left in the pot after serving it.

Tips and Instructions

First, I spiraled four yellow squash. There were two of these pans full of spiraled squash. It is best if you do way before you plan to use it. I spiraled my squash in the morning and used it for a late lunch. If that isn’t possible, I would think you could do a lot of patting dry with some paper towels. You want it as dry as possible. Zucchini would definitely work here also.

When you get ready to cook it, I put it in my Copper Crisper and put it on 400 until I saw some browning. You could use an air fryer or a cookie cooling rack on top of a cookie sheet. What you are trying to accomplish is to dry it out and cook it just enough to keep it from being wet and soupy in your pasta later. As a last resort put them on a nonstick cookie sheet. It’ll have to be nonstick or you will have to use oil. My basket is nonstick.

img_0241

Boil Noodles

Put some water to boil and boil the pad Thai noodles just until done. Follow package directions.

Sauté onions, garlic, and mushrooms

Next, use one tablespoon of oil to sauté the garlic, onion, and mushrooms on medium heat. The rest of this recipe is oil free, and you could omit the oil here as well. However, I really feel like the oil helps to achieve the right browning. Omit this one tablespoon and cook them with water at your own risk. The mushrooms would take on more of a jar texture this way.

Chop your sun-dried tomatoes and make your avocado-basil sauce.

Turn Off the Heat and Add in the Sun-Dried Tomatoes, Squash and Noodles

Then, turn the pan off and immediately put in the squash you cooked, stirring to break up the squash before you put in noodles.

Then, add the sun-dried tomatoes and noodles. Stir, and let the heat from the pan keep the food warm. We will not be cooking it any more.

Make the Creamy Sauce

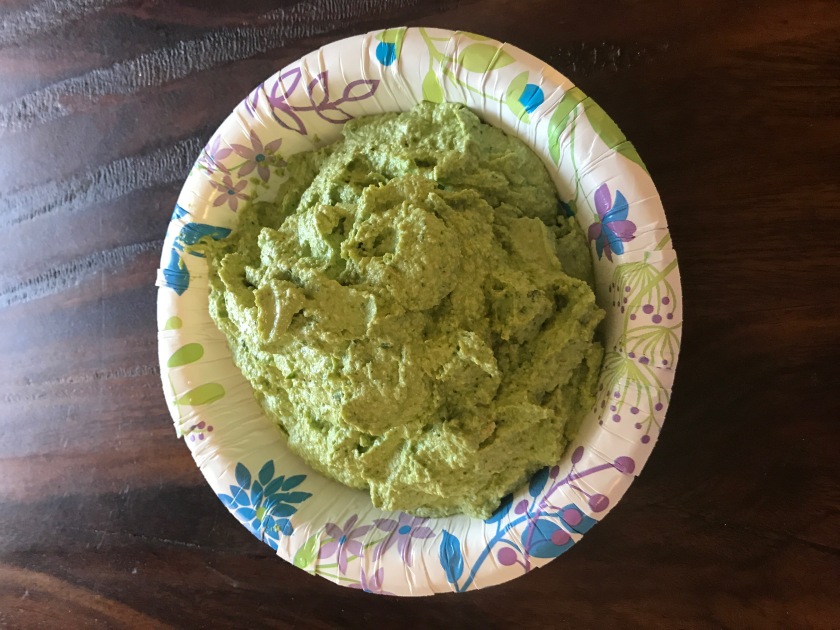
Mash the avocado with a fork and add the other sauce ingredients. Do not worry if it is a little lumpy, but make it as smooth as possible as a fork. Do not put the basil in a food processor or blender unless you want green pasta instead of little flecks of basil. The sauce should look like any pasta sauce. If it is too thick, add extra soy milk. Or use whatever kind of milk you prefer.

Also, if you do not have Tony Chachere’s. You can use garlic salt, chili, cayenne pepper, and black pepper. You could also use a peppery seasoning mix you know that you like or another cajun seasoning. This is a southern blog after all, and any serious cook within a few hours of New Orleans has Tony Chachere’s in their cabinet. If you really want to have some, here is a copy cat recipe: Tony Chachere’s Copy Cat Recipe. Or just go ahead and order some from Amazon:  Tony Chachere’s from Amazon.

Add the Sauce and Reheat a Little

Put the sauce on the noodle mixture and stir. The sauce is going to be cold and it is going to cool everything down. Go ahead and reheat the pot to warm it up. Do not cook it. Just reheat it a little.

img_0243

Voila!

Vegan Creamy Squash and Mushroom Noodles

  • 4 yellow squash, spiraled (or zucchini)
  • 7 oz uncooked pad Thai noodles
  • 1 Tbsp olive oil
  • 1 Tbsp minced garlic
  • 8 oz package sliced mushrooms
  • 1/2 medium onion, diced
  • 5 oz sun-dried tomatoes (I used the ones from a jar)

Sauce Ingredients:

  • 1 ripe avocado, peeled and mashed
  • 0.75 oz package fresh basil
  • 1/4 cup soy milk (or whatever kind of milk you prefer, but make sure yours is gluten-free if you are concerned about that.)
  • 2 Tbsp lemon juice
  • 2 tsp Tony Chachere’s Creole Seasoning (see above notes for substitutions)
  • 2 tsp garlic powder
  1. Preheat oven to 400 degrees.
  2. Spiral the yellow squash and leave it out to dry for a few hours of possible. If you can’t towel dry it with paper towels as much as possible to remove moisture. Put the squash on a copper crisper, cooling rack in a cookie sheet, or in an air fryer. Cook the squash until you see some browning. Approximately 15 minutes. Remove from oven and cool.
  3. Cook the pad Thai noodles according to package directions.
  4. Sauté the onions, garlic, and mushrooms in 1 Tbsp olive oil on medium heat until some browning occurs.
  5. Add the squash and stir to break up noodles.
  6. Add the noodles and sun-dried tomatoes.
  7. Mash the avocado with a fork and add the other ingredients and stir. It may be a little lumpy, but do not use a food processor or blender to avoid green pasta and retain flecks of basil. Add extra soy milk if your sauce is too thick.
  8. Add the sauce and reheat just a little since the sauce will be cool. Do not cook the mixture.

Creamy Vegan Grits with Greens and Garlic

I had to try this as soon as I saw the recipe. If I could think of one recipe that epitomizes the name of my blog, grits and greens would be it.

Here is the recipe:

Bryant Terry’s Creamy Vegan Grits with Garlic and Greens

Grits.

First of all, know that I can’t follow a recipe exactly no matter what I do. I just can’t help myself. In this case, I wanted it NOW and soaking cashews for three hours wasn’t going to happen.

I only soaked the cashews until the grits were done.  From what I can tell, that’s plenty of time only if you have a high powered blender/food processor. Don’t do it if you have inexpensive low-powered machines. Also, I might just omit the cashews all together next time. The broth and some nutritional yeast would give plenty of flavor. I believe that the cashews gave the recipe way too much fat. I also didn’t use oil to cook the onions. I just used a little broth. Be careful not to burn them.

I used quick 5-minute grits for the recipe, but don’t be fooled: Any good southerner knows that you cook grits for 30 minutes to an hour no matter what the directions say.

If I were to do it again, I would definitely use my instant pot to cook my grits. I just prefer not having to worry about sticking while I am cooking the amazing spinach.

Now for the spinach.

I didn’t use oil because I thought the fat from the nuts was PLENTY.  I also didn’t do the garlic chips so that the cloves were crispy and brown. I was tired and this recipe was a lot of work. Putting minced garlic in just before the spinach was just fine.

The taste of the spinach was divine! I used red wine vinegar because I was out of apple cider vinegar, but was amazing!

Forgive the paper bowl picture, but I am a southerner after all. That’s just the way we do things down here. I’m not in this to be fancy.

4C0E263E-D972-47D3-8039-6ACF15F6866C


Zucchini Roll-Ups

I decided to try these zucchini roll-ups.  So, how were they?  I loved the flavor and I would make them again. I turned them into a project with my daughter, so they weren’t nearly as pretty as the ones in the recipe. I was super impressed that a six year old could handle the roll-ups. However, I am not sure that I would make this dish for a family gathering since they just weren’t as pretty as the picture. If she can, that should give anyone a little confidence.

Here is the recipe:

Protein-Packed Zucchini Roll-Ups

I started by making the sauce. I didn’t like all the bowls and complicated nature of the directions, so I just put everything except the crushed tomatoes in my instant pot for 12 minutes.

IMG_0205

Then I added the water.

IMG_0206

After I let the pressure cooker do its thing, I started making the stuffing for the zucchini.

It was so easy!

EC473C0C-A22F-4894-B223-0657E3AB6E18

It looks kind of like baby food. Yuck!

After the instant pot was done and I put the crushed tomatoes in, I prepared the zucchini by sprinkling them with salt. One thing I did was wash the salt off of the zucchini. The directions didn’t say to, but I didn’t want them to be salty.

My daughter found putting it all together really easy in fun! I didn’t even have to do that part, so I got to work on cleaning up!

59B9D01A-884A-420E-B1B2-71010118075F

I ended up with a ton of the stuffing left, and I didn’t want to waste it. The dish was kinda ugly anyway, so I just put some on top.

Here it is after cooking it:

51744316275__DCC95F7F-E4D5-4636-BB06-EEE4EC589894-1

Vegan White Chili

I’ve had a recipe for white chili in my family for a while, but when I began eating a plat-based diet, this is one thing I missed the most. It took me a while to try to veganize it because it has cream, sour cream, and chicken. I was worried that substituting all those ingredients would change it completely. I have never been more wrong! It turned out fantastic!

IMG_0186-2

Vegan While Chili Recipe

3 ounces Butler’s soy curls

2 cups water

1 heaping Tbsp vegetable Better than Bullion

1 medium onion, chopped

1 Tbsp minced garlic

2 cans great northern beans, rinsed and drained

1 7 oz can chopped fire roasted green chilis

14 oz vegetable broth made with Vegetable Better than Bullion

salt to taste (2 teaspoons approx)

1 1/2 tsp ground cumin

1 tsp dried oregano

1/2 tsp black pepper

dash of cayenne pepper (or to taste)

1/2 cup soy milk

1 cup brown rice, cooked in vegetable broth

Sour Cream Mixture:

1 cup raw cashews, soaked overnight

1/4 cup fresh lemon juice

dash salt

1 tsp nutritional yeast

1/2 cup water (fresh, not the water you soaked the cashews in)


  1. Cook your brown rice in vegetable broth according to package directions. I use my rice cooker.
  2. Start by soaking your soy curls in the water and Better than Bullion Vegetable. They should soak 10-15 minutes, so be ready to start chopping and cooking the onion and garlic when you start soaking them.
  3. In the bottom of a large pot, sauté the onions and garlic in a few tablespoons of the vegetable broth you have the soy curls in. Be careful it doesn’t burn. Cook until the onions are translucent and starting to brown.
  4. Add the beans, chilis, broth, and spices to the onion and garlic.
  5. Chop up the soy curls and add them to the pot.
  6. Cook on medium until the mixture is heated through and simmering.
  7. Meanwhile, made your sour cream mixture by adding all of the sour cream mixture ingredients to a blender.
  8. Add the “sour cream” and soy milk to the pot. Heat just until warm again, but do not  bring it to a boil or cook it long.
  9. Serve by pouring the chili over the brown rice.